Eng_Lab 01 - introduction and Docker
Lab. 01 - Introduction and Docker
1. Introduction
What is this course about?
The Autonomous Mobile Robots laboratory classes aim to introduce you to ways of dealing with the challenges met when working with robots that, without human control, have to do their work while moving in a changing environment. The methods we will analyze can be used on a wide range of robots: from mobile warehouse platforms, through rescue drones, to autonomous cars.
What will the work look like?
During the classes you will read the instructions, do the tasks described in them and, based on the knowledge gained this way, complete homework assignments (in the form of a quiz or a program to write).
From time to time there will be so-called “problem-solving laboratories”, where, after a joint discussion at the start, you will face an open problem and the goal of the class will be to work out a solution using your own knowledge, online resources and cooperation with the rest of the group. The homework after such a class will be a report on what you managed to do and a proposal of further steps. Satisfactory progress after these classes can earn you extra points (more about grading).
Schedule
- Organizational meeting + Docker basics
- ROS2 Action
- 2D laser localization: SLAM (Simultaneous Localization And Mapping), AMCL
- Behavioral architectures
- Problem-solving laboratory 1
- 3D SLAM
- Visual SLAM, part 1
- Visual SLAM, part 2
- Kalman filter
- Topological localization
- Problem-solving laboratory 2
- Deep Q-learning, part 1
- Deep Q-learning, part 2
- Final assessment
- Final assessment retake
Grading
The laboratory grade consists of two parts: - homework assignments (50% of the grade) - a test on the eKursy platform (50% of the grade)
The total number of points from both parts can be increased by extra points earned during the problem-solving laboratories.
FAQ
2. Docker
The goal of the rest of the class is to learn the basics of using Docker and working with containers in Visual Studio Code.
Docker is described as a tool that lets you put a program and its dependencies (libraries, configuration files, local databases, etc.) into a lightweight, portable, virtual container that can run on almost any server with a Linux-based system. Containers and their contents run independently of each other and are not aware of each other’s existence. They can, however, communicate through strictly defined channels. Because they run on one shared operating system, software containerization is a much lighter (less resource-hungry) form of virtualization than full virtualization or paravirtualization with virtual operating systems.[source]
Start by installing Docker.
Installation on Ubuntu 22.04
Note: if you work on a computer in the laboratory, the installation is not needed. You can then skip part of the instructions and go HERE. It is still a good idea to go through these steps on your own computer, because you will need to work with containers for the homework assignments.
Setting up the Apt repository:
sudo apt update
sudo apt install ca-certificates curl gnupg
curl -fsSL https://download.docker.com/linux/ubuntu/gpg | sudo gpg --dearmor -o /etc/apt/keyrings/docker.gpg
sudo chmod a+r /etc/apt/keyrings/docker.gpg
echo \
  "deb [arch="$(dpkg --print-architecture)" signed-by=/etc/apt/keyrings/docker.gpg] https://download.docker.com/linux/ubuntu \
  "$(. /etc/os-release && echo "$VERSION_CODENAME")" stable" | \
  sudo tee /etc/apt/sources.list.d/docker.list > /dev/null
sudo apt update
Installing Docker:
sudo apt-get install docker-ce docker-ce-cli containerd.io docker-buildx-plugin docker-compose-pluginVerifying the installation:
sudo docker run hello-worldManaging Docker as a non-root user
Create the docker group:
sudo groupadd dockerAdd the current user to the docker group:
sudo usermod -aG docker $USERApply the group changes:
newgrp dockerVerify that it works without sudo:
docker run hello-worldGUI applications
During the classes you will need to run GUI applications, e.g. to
view a camera image or to visualize sensor readings. For this reason,
if you have an Nvidia GPU, you need to install the
NVIDIA Container Toolkit package following the instructions.
You also need Nvidia drivers in version >= 418.81.07 (you can install
them with the Software & Updates application ->
Additional Drivers by choosing the right driver).
If the computer has an Nvidia card and the drivers are installed correctly, the command
nvidia-smishould give you output similar to this:
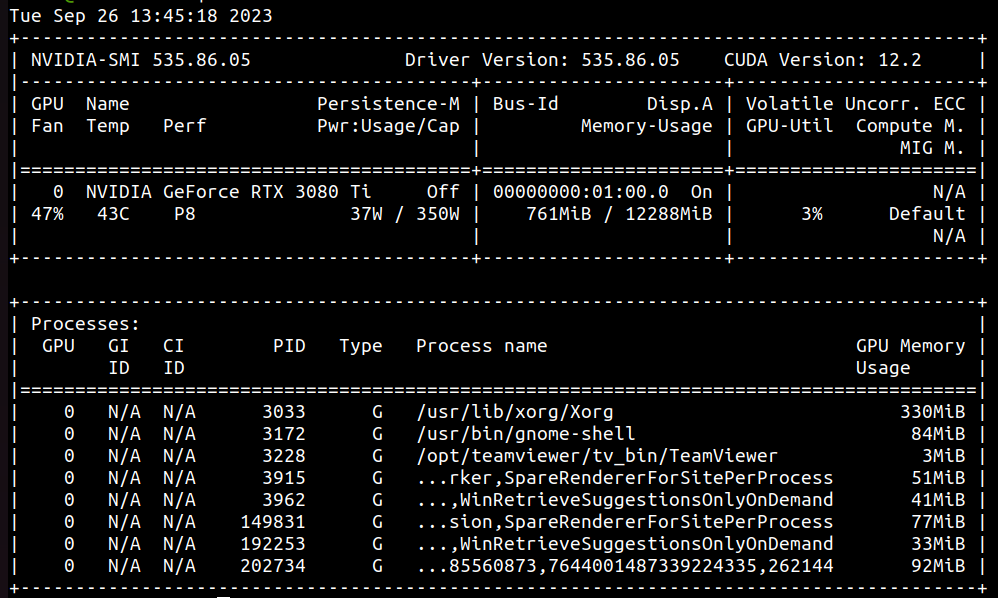
Here you can see the driver version (535.86.05), the name of the graphics card (NVIDIA GeForce RTX 3080 Ti) and its current load (3%).
Installing the NVIDIA Container Toolkit
Configuring the Apt repository:
curl -fsSL https://nvidia.github.io/libnvidia-container/gpgkey | sudo gpg --dearmor -o /usr/share/keyrings/nvidia-container-toolkit-keyring.gpg \
  && curl -s -L https://nvidia.github.io/libnvidia-container/stable/deb/nvidia-container-toolkit.list | \
    sed 's#deb https://#deb [signed-by=/usr/share/keyrings/nvidia-container-toolkit-keyring.gpg] https://#g' | \
    sudo tee /etc/apt/sources.list.d/nvidia-container-toolkit.list \
  && \
    sudo apt-get update
Installing the package:
sudo apt-get install -y nvidia-container-toolkitConfiguring Docker:
sudo nvidia-ctk runtime configure --runtime=docker
sudo systemctl restart docker
Working with Docker
When using Docker you constantly come across two terms:
image and container. It is very important to
tell them apart. - image - a template of a given
system. It is read-only. It contains the code, libraries, tools,
dependencies and other files needed to run. It can be created from a
container with the docker commit command. -
container - created by running an image. It is an
isolated place where an application can run without affecting the rest
of the system. Once stopped, a container does not start again
automatically. When a container is stopped, the changes made in it are
kept.
Docker vs. a virtual machine
Please look up online how Docker differs from a virtual machine and what its advantages and disadvantages are.
Pulling an image and creating a container
Start working with Docker by pulling the ubuntu image:
docker pull ubuntuThen you can create a container:
docker run ubuntu:latestWhen a container is created this way, seemingly nothing happens. It is not started and not shown in the terminal. To start the container right after creating it and attach to it, run:
docker run -it ubuntu:latest bashThis way the terminal connects to the container right away and you can keep working in it.
You can leave the container with the exit command or
with ctrl+d. After you leave, the container is stopped, but
its current state is kept.
You can list all created containers with:
docker container ls -awhere leaving out -a lists only the running
containers.
Removing unneeded containers
Please list all containers and remove the ones created earlier in this class with:
docker container rm ...where ... should be replaced with the names of the
containers to remove (you can give several, separated by spaces).
Using scripts to create containers
Setting up a container can take time and it is easy to miss an important argument, so it is good practice to prepare bash files (.sh) that create the container.
Depending on your hardware, use the scripts for computers without a GPU or with an NVIDIA GPU to create a container with the command:
bash run_cpu.shor
bash run_gpu_nvidia.shAfter the script runs, the terminal should be attached to a container named ARM_01.
NOTE! The scripts automatically remove the ARM_01 container if it already exists on the computer.
Basic Docker operations
A stopped container can be started with
docker start ARM_01You can attach to the container from many terminals with
docker exec -it ARM_01 bashThe container can be stopped with
docker stop ARM_01An image can be removed with:
docker image rm ubuntuAutocompletion in Docker
Sometimes TAB autocompletion is not installed by default
in the pulled image. You can install the package with
apt install bash-completionAs you can see, with Docker you do not need sudo. By
default you are logged in to the container as root.
Working with many terminals at once
Many practical robotics applications require using several terminals
at the same time. You can of course switch between many terminal
windows, but these alternatives are often more convenient: - Running
commands in separate tabs. A new tab can be opened with
ctrl+shift+t. To switch tabs, use alt+X, where
X is the tab number, or ctrl+PageUp/PageDown. - Using the
Terminator
terminal. - Using the tmux terminal.
Disk space management
Over time Docker can fill up the hard drive. When building images (e.g. for this course), Docker also keeps all the files and temporary data used while building the image. You can check how much space the different Docker elements take with:
docker system dfTo free up disk space you can use:
docker system pruneNOTE: This command removes all stopped containers, networks, volumes and unused images. Make sure you do not remove something you still need.
It is safer to remove only unused images (dangling images). These are images that are not used by any container. You can remove them with:
docker image pruneNote that Docker also keeps a build cache, needed to build images quickly. You can remove it with:
docker builder pruneOptionally, add the -a flag to remove the whole cache,
not only the parts not linked to any image. NOTE: After
removing the cache, building images will take longer.
Independent tasks
- Create the ARM_01 container using the prepared scripts.
- Stop and start the container and attach several terminals to it.
- Install the
geditpackage in the container:
apt update
apt install gedit- Run
geditin the container and check that its window is displayed correctly. - Modify the container creation script to pass a chosen host directory to the container. How can you make a file created in Docker editable on the host?
Appendix: Docker in VS Code
Working with Docker can be somewhat tedious because you constantly have to move around in the terminal. With Visual Studio Code, however, you can attach to a container and work on its files as if they were files on the host.
Installing VS Code and extensions
On the laboratory computers everything should already be installed.
Do all of these steps without Docker.
Download the .deb file from the VS Code website and install it with
sudo apt install ./<file>.debVS Code can be started from the application list or with
codeIn the extensions list on the left (or ctrl+shift+x),
search for Dev Containers (ms-vscode-remote.remote-containers)
and install it.
Then click the button in the lower left corner (overlapping “>” and “<” symbols), choose “Attach to Running Container” and select the running container. If the container is not running, start it as described above.
From now on you can write code, run it and save it in the container using VS Code.
Authors: Kamil Młodzikowski, Michał Nowicki